


I am not bored, but this was a fun project that was born while looking for an API to consume. While looking in this repository, I saw one item in the list that sounded curious to me 🧐. It was exactly the BoredAPI one.
I decided to go on with it and aI built this funny project.
Previous to looking for an API, I thought on which technology I was going to use for it. I've always used JavaScript and Bootstrap, so I decided to go a step further and use TypeScript as main language and Tailwind for the styling of the project. I'm happy I did 💪.
Since I've been using Vite for a while now, I found that Vitawind along with the react-ts template was the perfect match.
Along the way I learned a few things like, for example, defining interfaces and types. A clear example is the ActivityResult component:
...
interface Props {
  data?: any;
  loader?: boolean;
  toggleLoader?: any;
}

type Values = {
  activity: string;
  participants?: number;
  type: string;
  price?: number;
  accessibility?: number;
  link: string;
};

const ActivityResult = ({ data, loader, toggleLoader }: Props) => {
  const { participants, type, price, accessibility } = data;

  const [values, setValues] = useState<Values>({
    activity: "",
    participants: undefined,
    type: "",
    price: undefined,
    accessibility: undefined,
    link: "",
  });
...
I found out that, in React 18 you have to specify somehow the kind of data that you are passing through props, so I created the interface to let the component know. Another thing was using the useState hook. I knew you could define the type for it, but not that specific. So instead of using number, string or any other, I created the type Values specifying the type for each property. I know it can be done better, but my knowledge while creating the app was not that extensive.
I didn't want to use any global state manager (I thought there was no need for this app), so I found this way using (for the first time) the useLocation hook. To make its explanation short, when you use navigate, you can define a state. I defined a state for the values that were submitted in the form and then, using location, retrieve those values stored in the state.
Form component
...
const navigate = useNavigate();

const handleSubmit = (e: React.FormEvent<HTMLFormElement>) => {
    e.preventDefault();
    navigate("/activity", {
      state: { 👈 HERE
        participants: values.participants,
        type: values.type,
        price: values.price,
        accessibility: values.accessibility,
      },
    });
  };
...
Activity page
...
interface IProps {
  isLoading: boolean;
  setIsLoading?: Dispatch<SetStateAction<boolean>>;
}

const Activity = () => {
  const location = useLocation();
  const [isLoading, setIsLoading] = useState<boolean>(false);

  return (
    <div className="flex flex-col items-center justify-center">
      <WantAnother toggleLoader={setIsLoading} />
      <ActivityResult
        data={location.state} 👈 HERE
        loader={isLoading}
        toggleLoader={setIsLoading}
      />
      <Footer />
    </div>
  );
};
...
Styling
Looking at the styling configuration, I knew the background was going to be yellow (don't ask me why). So when I found the yellow I wanted, it was time to find a color to match it conveniently 😆. I looked up at colorHexa and took the complementary color recommended. Not only this, but I configured a few different options for it inside the tailwind config file. It's very useful if you want to add a specific range of colors or only one. This is how it looks:
module.exports = {
    content: ["index.html", "./src/**/*.{js,jsx,ts,tsx,vue,html}"],
    theme: {
        extend: {
            colors: {
                matchBlue: {
                    700: "#6E85FD",
                    800: "#5A74FD",
                    900: "#4764fd",
                    1000: "#3454FD",
                    1100: "#2043FD",
                },
                hover: "#202020",
                linkedin: "#0a66c2",
                hashnode: "#2962ff",
                twitter: "#1d9bf0",
                instagram: "#fe0a64",
            },
        },
    },
    plugins: [],
};
If you want a new range of colors, you specify the main color name and inside curly brackets the range or number (whatever you want to call it). For a specific color without variations, you just specify the name and the color itself.
As always, I made the design responsive, and with tailwind was really easy.

One downside of using tailwind, everybody knows, is that the class/className can get a bit long, but nothing more far than this.
Minor difficulties
Something that was causing a bit of trouble to me was the call to the API with the value from the select dropdown. All the options have an icon at the end, and axios wasn't liking it 👎. To solve this, I created this function to delete the icon (and the residual spaces):
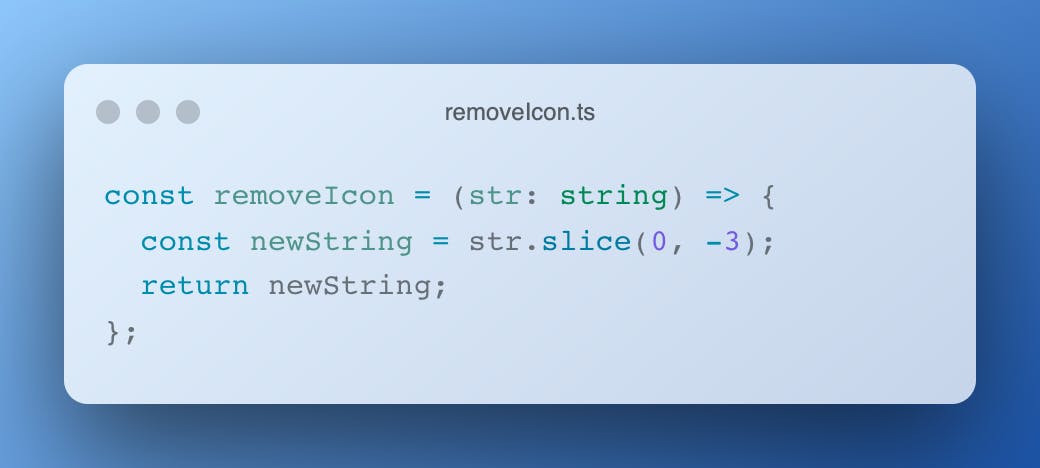
I used it directly inside the url created with template literals chaining the different values needed to retrieve data from the API.
const url = `https://www.boredapi.com/api/activity?type=${removeIcon(
    type
  )}&participants=${participants === undefined ? "" : participants}&price=${
    price === undefined ? "" : price
  }&accessibility=${accessibility === undefined ? "" : accessibility}`;
FYI: Keep in mind that the activities come from an API so using filters can result in empty responses (I put them in to use all the parameters but don't rely that much on price and accessibility).
It was a nice first contact with TypeScript and Tailwind, which I'll be using in the future for sure.
Check the project here!
Hope you like it!
Salut, Jordi.